To all ye who want to paint with light ...

I should have started this blog many moons ago as I started experiencing the joys of rediscovering the art of photography. But as the saying goes - it's better late, than never!
So, here I am, in the hopes of recording what I learn as I progress from ignorance to enlightenment; about what my eyes can see that my camera can capture; and, what my mind imagines and my camera paints with its capabilities.

Please feel free to add any comments and share your wisdom (tips or tricks) that you have picked up along the way.

And do check out my How-To and Birding pages as well.


Thursday, December 29, 2011

A Cold and Misty Morning

Sunrise-5

Sunrise-6

I remember the first time I had seen the mist over the river one chilly winter morning last year.  I had been on my way to work and when I'd looked out of the window, I'd seen mist curling up from the water's surface.  I hadn't seen anything like that before, and I remember being intrigued by it.  I was on the bus, no camera handy, so all I could do was whip out my cellphone and click a couple of snaps before the road curved and the river was out of sight. I mentioned it to a colleague and he told me that he had seen it before and that it happened on a chilly and bright morning right after a mild day during the winter.  It made sense that the cold air would mist up when it came in contact with the relatively warmer waters.  And since that first time, I'd seen this once more after that.

Sunrise-1

Since I'm on vacation, and I thought it might be nice to do some photography at sunrise, I decided to wait for a mild day followed by a really bright and chilly one.  I checked the weather, checked the cloud cover, and then checked the temperatures.  Seemed perfectly what I was looking for!  So, I set the alarm for 6:30 am.  

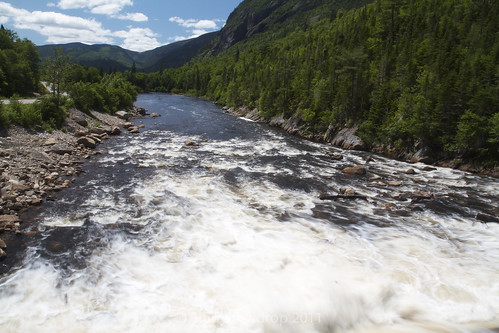
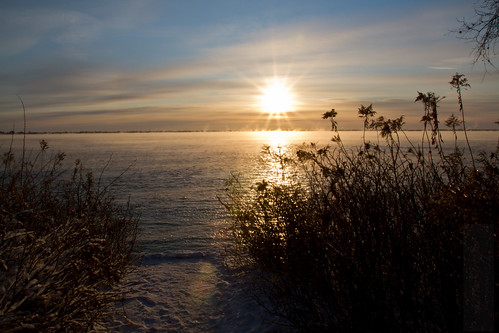
I would need about 15 to 20 mins to reach the spot I had in mind, and then another 5 mins. or so to set up.  I would have at least 20 mins, before the actual sunrise at 7:33 am.  Except when I reached the spot, I realized that the sun had moved during its annual journey and the sunrise wouldn't be visible from that spot any longer.  I was frantic.  I walked down another 500m or so and found the spot where it looked like the sun might be hiding just below the horizon.  Praying that was it, I set up.  

Sunrise-2

Sunrise-3

The temperature was minus 19 deg C and with the windchill it was around minus 23.  I was dressed quite warmly and I hadn't planned on staying out for long anyway.  But the wind, especially because I was right next to the river, was bone chilling.  My ears and nose started to freeze first, and then my fingertips.   

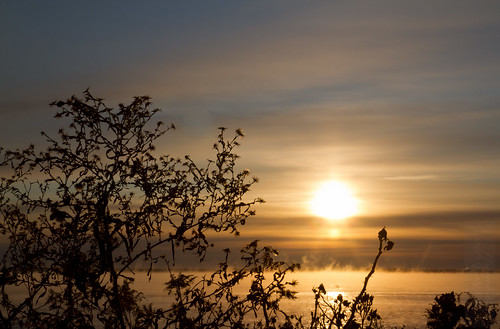
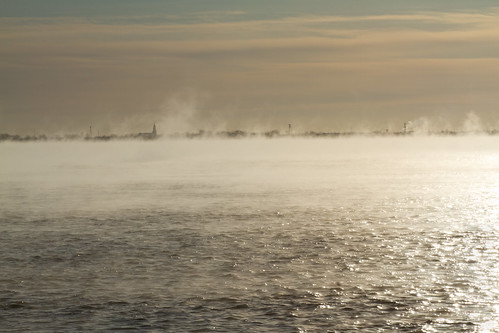
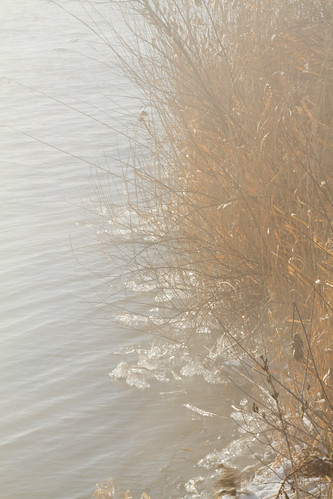
And then the magic happened!  The sun started to peep out just above the horizon and as it got a little bit brighter, I saw the mist curling upwards - slow, small curls to begin with, and then it suddenly seemed like the river water was boiling and steam started pouring forth. The wind blew the mist right up to the shore, and it was absolutely breathtaking! 

Sunrise-4

Sunrise-8

Sunrise-10

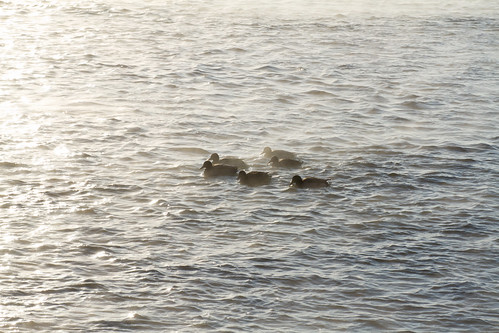
I forgot my fingers, and my toes.  I just kept my eyes on the river.  And all of a sudden, a flock of ducks landed on the water.  That was a once-in-a-lifetime sight that I wasn't prepared with my camera for.  I had no idea that there would still be ducks in this kind of weather, but the winter had been really mild up to that point, and I have a feeling the birds, and the trees are thoroughly confused by it.  

I wasn't carrying my long lens, so I took a couple of shots and zoomed in on my LCD to see what species of ducks they were.  Although they were back-lighted by the sun, the shapes of their heads and bills told me they were Goldeneyes and Mergansers.  It set me wondering if these ducks remained in this region all year round, but that would be difficult because when the river finally freezes over, they would find no food!  

Sunrise-9

Anyway, I am planning to make another trip down to the river in the next few days to see if I can find them again. I also saw a Mallard family swimming closer to the shore than the other ducks and it would be interesting to see if they hang around during the winter as well.  I do remember seeing a pair of them early this year, when there was still a lot of snow on the ground and the little lake in the forest was still frozen.

Sunrise-11

Since I'd missed the photo op of the ducks landing on water, I thought I might be able to see them leave.  But no luck - I waited for over 2 hours, but they stuck around happily swimming in the golden mist!  They looked beautiful like that, but I know they would look beautiful at take-off.  And my half-hour outing had turned into 3.5 hrs, and I couldn't feel my toes and fingertips any more.  I was scared I'd get frostbite, and therefore turned to head home.  And would you believe that I had hardly left the scene, when I heard the ducks take flight?  I looked out over the river again.  There indeed they were, flying off into the distance, and being behind a cluster or really tall trees, it made no sense to even attempt a shot.  

Sunrise-12

Sunrise-7

Well, damn the ducks, at least I had the opportunity of seeing the mist over the river that morning!  

Monday, December 19, 2011

Strawberry Cupcakes

Thanks to my son, now I have to bake my cupcakes and eat them too! :(  Not good, considering I shouldn't be consuming any more sugar than I already do.  I should have self control, you say?  Well, if you knew what kind of internal battles I fight every time I look at a sugary treat, you would know I'm trying really hard.


I got the idea of strawberry cupcakes because I found strawberries at unseasonably low prices at my neighbourhood grocery store.  And since I'd been promising to bake cupcakes for the past month, I thought I should just seize the opportunity and the berries and put them to good use.  


I recently indulged in some baking tools and this would be the best occasion to break out my neat little cupcake liners.  I love the pattern and thought they would be perfect for the pink delights. 


I'm not that great at piping, but thought I'd take the opportunity to just use the pastry tips the best I can.  Didn't turn out too bad in the end, did they?


Enjoy your cupcake with a glass of milk, or a cuppa tea or coffee! 


Here's the super-easy recipe!

The Cupcake

Self-rasing flour - 150 gms (5 oz)
Baking powder - 1/2 tsp
Salt - a couple of pinches
Granulated sugar - 150 gms (5 oz)
Butter (room temperature) - 150 gms (5oz)
Eggs, beaten (room temperature) - 3 (medium)
Vanilla essence - 1/2 tsp
Strawberry essence - 1tsp

The Low-Fat Cream Cheese Frosting

Light cream cheese (room temperature) - 125 gms 
Butter - 100 gms
Confectioner's/icing sugar - 8 0z
Strawberry essence - 1 tsp
A few strawberries and other decorations for the topping

Method

The cupcake
  1. Preheat the oven to 350 deg C.
  2. Line a cupcake pan with paper liners, or grease it and keep aside.
  3. Put the butter in a bowl and beat with an electric beater for a minute or so.  
  4. Add the sugar (preferably sifted), a bit at a time and beat until light and fluffy.  Scrape down the sides of the bowl as necessary.
  5. Add the vanilla essence and then slowly add the eggs; continue beating for another minute or so.  You might find the mixture curdling a bit, but don't worry, it's normal.
  6. Sift the flour, baking powder and salt together in another bowl.
  7. Add the dry ingredients to the wet.  Start on a low speed and gradually increase the speed till the mixture is light and fluffy again.
  8. Fill the cupcake pans halfway to the top with the batter.
  9. Bake for about 18 - 23 mins.  You will need to check the cupcakes at the 18 min. mark so see if a toothpick inserted in the centre comes out clean.  If you see a few wet crumbs, leave them in for a couple of mins. and check again.  Baking them too long can make them chewy and dense.
  10. Once the cupcakes are done, let stand for a couple of minutes and them remove them to a wire rack to cool completely.
The frosting
  1. In a bowl, beat together the butter and cream cheese till fluffy.
  2. Slowly add the sugar and strawberry essence.  
  3. Add the cream, if using.
  4. Beat on high for 3 - 4 mins. till light and fluffy. The mixture should form firm peaks.
  5. If the mixture looks too runny, add more sugar; if it looks too thick, add a teaspoon full of cream at a time to bring it to piping consistency.
  6. Use a piping bag to pipe the frosting on to completely cooled cupcakes, or use a knife to slather on the frosting. 
  7. Top with fresh strawberries or other decorations.

Chef's tip: I prefer to keep it low in fat and sugar, but you are very welcome to use the full fat cream cheese and sweeten it to your taste as well.  The original recipe called for 2 cups of sugar, but I used only a cup (8oz).  Additionally, I omitted the cream.  If you use 2 cups of sugar, you will definitely need some cold whipping cream to thin the frosting down a bit and add some fluffiness.  Cream makes it lighter on the palette, but it's far from lighter on the system, if you know what I mean!

And by the way, keep a look out for my Chocolate Lava Cake recipe to come in the next couple of weeks, if not sooner. :)  

Tuesday, December 13, 2011

Announcement: My Work Gets Published

I've been meaning to post this for a while, but something or the other always got in the way.  My recipe and food photography was recently published.  It's the blueberry trifle recipe that I've already posted, but seeing  it on another website is so much more exciting.

You can find the recipe here.

Tuesday, November 29, 2011

Happy Birthday, Master Cartoonist!

This post is dedicated to Jon Druker, my favourite cartoonist at this point in time (Jon, if you don't keep your comics coming regularly, you might be replaced! Ok, I'm joking about that, I guess you know).

I had promised to all you cartoon-lovers that he had offered to grace my blog another time.  And even though it's his birthday, and the gift should be from me to him, he decided to defy tradition and send a gift my way in the form of this post.

I asked him if he'd like to share his thoughts about his art as he looks forward to the year ahead, and he very kindly sent me his words of wisdom. There's a lot to learn from what he says here.  Read on and do visit his latest comic strip here!


After running into Toni for the second time in as many days, I began to think about the value of a picture. Knowing Toni is a photo buff at heart, I often wonder how she or any other photographer sees the world. As a cartoonist of ill-repute, my eyes are often my camera as I picture my comic layout in my head like a photog would. Framing, lighting, mood, expression, texture, all the things that make up a good picture.
But I have to add storylines, dialog and consecutive character positioning to build what could be a moving set of images. But it all starts with the pictures (and not the voices) inside my head. And the pictures are often the result of ideas that stem from random discussions. Like the one my wife and I had about clothing and seamstresses that led to me laughing out loud in the car as I cobbled together the dialog and frames for a new comic.


So my advice to you if you are the creative type, take as inspiration the work of others, the words of others, and even the sounds of others, then shade them with your rose-colored glasses and go from there. You may produce great works, mediocre, and even questionable work, but at least you will have produced something, and not just consumed. You'll feel better for it. I know I do. Just look at my Stanko & Tibor comic to see over years worth of my highly unique humor.


Happy Birthday, Jon!

Wednesday, October 26, 2011

Blueberry Trifle with Lemony Mascarpone Topping

If you are a fan of desserts, especially desserts that contain berries, you'll love this one. I have a really easy recipe for the blueberry sauce, which I use a lot in my crepes and pancakes.   However, the main recipe is borrowed and adapted.  Besides using my own blueberry sauce recipe and adding a larger quantity of lemon zest and essence in the topping, I mostly stayed true to the original.

Recipe for Blueberry Sauce
You will need:
Blueberries, frozen or fresh - 2 cups
Water - 1 cup + 2 tbsps
Sugar - To taste (I use about 3 heaping tbsps)
Lemon juice - 2 tbsps
Salt - a pinch
Cornstarch - 2 tbsps

Directions:
  1. Wash the blueberries, if using fresh, and put them to boil in a saucepan with a cup of water.  
  2. Bring to a boil and simmer for about 8 - 10 mins till they are cooked.
  3. Add sugar, salt and lemon juice and simmer for an additional minute while stirring the sauce to make sure that the sugar is distributed evenly.
  4. Dissolve the cornstarch in 2 tbsps of water and add to the simmering sauce.
  5. Stir continuously as it starts to thicken, and slowly bring to a boil one last time.
  6. Remove from heat and let stand covered. 
  7. You can store this in the fridge for up to 3 days.
Recipe for the Mascarpone Topping
You will need:
Mascarpone cheese - 225 gms
Heavy cream - 3/4 cup
Sugar - 1/4 cup
Lemon zest  from 2 medium lemons
Lemon essence - 4 - 5 drops
Piping bag with tip (optional)

Directions:
  1. In a small bowl, combine the sugar and the lemon zest.  Use your fingertips to really mix these ingredients well.
  2. In a medium bowl, add the mascarpone, cream, sugar and lemon zest mixture and lemon essence.  Beat with an electric beater until the mixture is light and fluffy and it forms moderately firm peaks. 
  3. Spoon into a piping bag with tip attached (if using), or set aside.

Assembling The Trifle
What you will need:
Pound cake - 4 thick slices, cubed
Blueberry sauce - 1 portion (recipe above)
Mascarpone topping - 1 portion (recipe above)
Trifle dishes/dessert cups - 4

Directions:
  1. In the cups, pipe or spoon a layer of mascarpone topping.
  2. Add a layer of cubed pound cake.
  3. Add a layer of blueberry sauce.
  4. Repeat the above steps.
  5. Finally, top off with a swirl of mascarpone, or a spoonful of blueberry sauce.

The end result is super delicious!  Check out the original recipe at My Baking Addiction - an absolutely amazing blog! The mascarpone cheese makes this really rich, so even a small serving goes a long way to throw any diet off its course!  And, watch out - this could be addictive! :)

Monday, October 10, 2011

Bell Peppers with Spicy Pork Stuffing

I had been longing to try my hand at making stuffed bell peppers, but I kept putting it off until recently (actually, not that recent, come to think of it; just didn't get the time to post this sooner).  Bell peppers were on sale (thanks to the bountiful Summer), and I thought that it would be just the right time to have a go at this. 

Sweet bell pepper stuffed with a spicy pork filling 
Anyone that knows me, knows I'm a big fan of spicy food, and fortunately for me, my son is too!  Therefore, I knew what my stuffing would be - a spicy meat filling.  

The filling

I had originally wanted to make the filling with lamb, but since luck didn't favour me that day, I didn't find ground lamb at the supermarket.  I'm not very fond of ground beef or chicken, so my only other option was to settle for pork.

I made this recipe up as I went along, and you can pretty much use any kind of meat for the filling.  I like to use a lot of onions, ginger and garlic, but you can always adapt the measurements to your taste.


I do plan to retry this recipe with crumbled Indian cottage cheese, called paneer, and mixed veggies sometime in the future.  I will be starting to get ready for my cooking classes again, so I have a sneaking feeling it won't be anytime soon.  If you try it ahead of me, please drop me a line to let me know how that came along.

Prepping

Here's the recipe that serves four!

Bell Peppers Stuffed with Spicy Pork

Ingredients
Bell peppers - 4 large (any kind will do; I used orange and yellow)
Ground pork: 250 gms
Onion, sliced - 1 medium
Green peas (frozen or fresh) - 1 cup
Potato, cubed - 1 medium
Croutons - 1 cup
Garlic paste - 1 tsp
Ginger paste - 1 tsp
Cinnamon - 1/2 stick
Cloves - 2
Green cardamom - 2
Peppercorns - 10
Cumin powder - 1 tsp
Coriander powder - 1/2 tsp
Turmeric - 1/2 tsp
Chilli powder - to taste (remember we're adding peppercorns)
Salt - to taste
Fresh coriander, chopped - 1/2 cup
Olive oil - 3 tbsp

Method
For the stuffing:
  1. In a grinder, add cinnamon, cloves, green cardamom and peppercorns and grind to a fine powder.
  2. Heat 2 tbsp of the olive oil in a large saucepan on medium heat, and add the ginger and garlic paste.  
  3. Saute for a minute and then add the sliced onion.
  4. Add the salt, and let the onions cook until they become translucent.
  5. Make a paste of all the spice powders with a couple of tablespoons of water and add to the onions.
  6. Let the spices cook for a few minutes, till they are nice and aromatic.
  7. While the spices are cooking, microwave the small potato cubes in 2 cups of water, so they are half-cooked (oven settings vary, but about 2 minutes on high in a 1000w oven).  Drain the potatoes and set aside.
  8. Once the spices look nicely cooked and you see the oil starting to leave the onion, add the ground pork. Cook well, breaking up any lumps with a spatula.
  9. Add the potatoes at this stage, cover the saucepan and let cook for about 10 mins, stirring frequently.
  10. When the potatoes are almost cooked, add the green peas, and cook covered for an additional 5 mins. 
  11. Add the croutons and fresh coriander, and mix them in well.
  12. The filling needs to be really dry, so if you see any moisture, cook uncovered for a few more minutes until completely dry. 
For the bell peppers:
  1. Wash the bell peppers very thoroughly under warm running water and pat dry with a paper towel.
  2. Slice off the tops of the peppers and retain.
  3. Pass a knife very carefully around the insides of the peppers to remove the seeds and the white pith. Be careful not to puncture the flesh on the sides or the bottom.
  4. Wipe down the insides of the peppers with a paper towel, making sure it's completely dry. 
  5. Take a few drops of the remaining oil on your fingertips and rub the insides and outsides of the peppers.  
  6. Stuff the peppers generously with the pork filling, and put the tops back on.
  7. Preheat oven to 350 deg.
  8. Line a baking sheet/tray with foil sprayed or rubbed with oil.
  9. Place the peppers on the tray and bake for about 45 mins to an hour (time could vary with different ovens). Make sure that the peppers are cooked, but not completely mushy.  They won't hold their shape, otherwise.
  10. Take the peppers out and gently brush them down with a little more oil.
  11. Put the oven to the highest temperature setting, and put the peppers back in for another 5- 7 minutes, till the skin starts to char a little. 
  12. Remove from the oven and let stand for 5 minutes, as they will be too hot to handle. 
  13. Carefully remove the peppers to a serving plate, and serve immediately.  Remember that the peppers will be a little soft and will need really careful handling to ensure they retain their shape.

Enjoy!  My son loved it, as you can tell from his plate! :)

Friday, October 7, 2011

B& W Project 52 - Week 9

B&W Project 52 - Week 9

B& W Project 52 - Week 8

Been under the weather lately, so everything is happening with a delay.  Well, as the saying goes - it's better late than never.  Therefore, I will have to post shots for two weeks together.

B&W Project 52 - Week 8

Wednesday, September 21, 2011

B&W Project 52 - Week 7

I thought I liked this shot, till I uploaded it to Flickr.  Now I don't, but I have to keep it since I don't have anything else to post for this week.

B&W Project 52 - Week 7

Sunday, September 18, 2011

Cedar Waxwing (Bombycilla cedrorum)

Please check out the new post on my birding blog.

Monday, September 12, 2011

B&W Project 52 - Week 6

Here's my beautiful model again!  And I swear I'm not cheating - she actually sat for a second photo shoot with me this past Saturday.

B&W Project 52 - Week 6

Tuesday, September 6, 2011

Saturday, September 3, 2011

New Post on My Birding Blog - Great Blue Heron

Long overdue again, but I finally did it!  Please check it out and do feel free to share it as well: http://shinydewdrop-birdwatching.blogspot.com/2011/09/great-blue-heron-ardea-herodias.html

Monday, August 29, 2011

B&W Project 52 - Week 4

I did a photo shoot for my friend last evening, and it was one of the worst disasters I've had thus far.  She got late arriving, so we were working in fast-fading light.  But I had already prepared myself for it, and had my flash at hand.

However, on reaching the park where we were supposed to have the session, my flash refused to fire!  I had no idea what had gone wrong with it or the triggers, and then it  starting firing very unpredictably once I started using my pop-up flash to trigger it.  I ran a number of tests this morning, but it's still not doing it's job as it should.  Maybe it's the sync chord that needs replacement?   Anyway, the entire session was a nightmare, and I didn't end up getting many nice images.

B&W Project 52 - Week 4
I added a selenium filter to this one in post.

The following image is technically very wrong as there's too much shadow in the face, especially around the eyes,  but there's something about it, that I really like, and therefore decided to post.  Please let me know if you think I'm crazy for posting this. :-S

Tuesday, August 23, 2011

Charming Charlevoix - Part 2

Parc National des Hautes Gorges de la Riviere Malbaie

Tranquil waters of River Malbaie

On the first day after arriving in Charlevoix, we drove up from La Malbaie and visited this breathtakingly beautiful park.  We had chosen to stay at La Malabaie only because it would be in close proximity to the few places we had planned to visit; the ride to the Hautes-Gorges Park took about an hour and a half.

River Malbaie

The drive was really lovely, and we passed through a number of fields of wildflowers and some really quaint and picture-perfect villages.  Something we observed was that each village had it's own landscaping  theme.  I particularly remember a couple of villages where one had put puppets/effigies in their front yard that ranged from an Elvis Presley doll, to a nun in her habit sitting and swinging.  Another village had small sets of the Nativity scene or little altars of worship at the front of their houses.  Unfortunately, they were country roads, and too narrow for us to pull over and take pictures.  Now I'm regretting not having attempted a few shots from the car itself.  Maybe I'll have the opportunity of going back again, if only to take pictures of these villages.

River Malbaie gushing forth

The park is surrounded by mountains, and the River Malbaie rushes through this gorge.  There are hiking trails, fishing activities, as well as canoeing and river boat cruising.  I managed to only hike on one of the shortest trails, because my friend and I were too busy taking photographs!  We were stopping after every two steps, and it`s a wonder we even made it to the summit.  The view from there was absolutely stunning!

Riviere Malbaie

There was one little patch of pretty pink Sheep Laurel and I just had to photograph them.
Sheep Laurel

And some very interesting cones
Purple cones

Silver cones

Canoeing seemed to be a popular activity at the park.  Although I didn't experience it first-hand, I think it might be a great experience to be out there boating on the river, taking in the beautiful views. 

Canoeing at the Parc

Getting ready for the race
... or participating in a group activity

Stacks of canoes ready to be pulled off the rack

It was a memorable day, and if I am ever to go back to Charlevoix, I want to visit this park again.