To all ye who want to paint with light ...

I should have started this blog many moons ago as I started experiencing the joys of rediscovering the art of photography. But as the saying goes - it's better late, than never!
So, here I am, in the hopes of recording what I learn as I progress from ignorance to enlightenment; about what my eyes can see that my camera can capture; and, what my mind imagines and my camera paints with its capabilities.

Please feel free to add any comments and share your wisdom (tips or tricks) that you have picked up along the way.

And do check out my How-To and Birding pages as well.


Wednesday, October 26, 2011

Blueberry Trifle with Lemony Mascarpone Topping

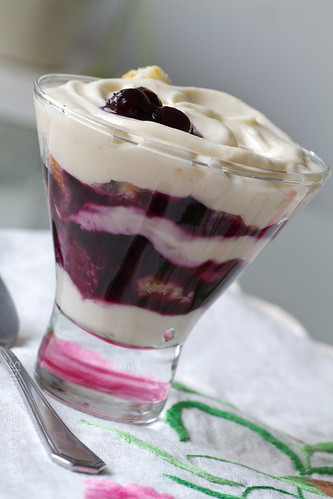
If you are a fan of desserts, especially desserts that contain berries, you'll love this one. I have a really easy recipe for the blueberry sauce, which I use a lot in my crepes and pancakes.   However, the main recipe is borrowed and adapted.  Besides using my own blueberry sauce recipe and adding a larger quantity of lemon zest and essence in the topping, I mostly stayed true to the original.

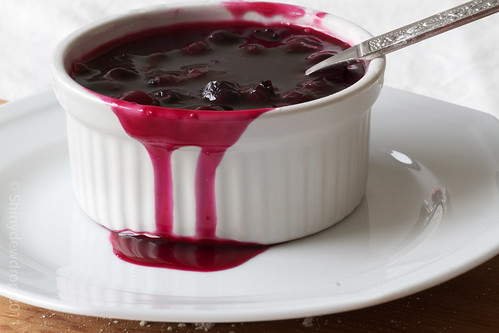
Recipe for Blueberry Sauce
You will need:
Blueberries, frozen or fresh - 2 cups
Water - 1 cup + 2 tbsps
Sugar - To taste (I use about 3 heaping tbsps)
Lemon juice - 2 tbsps
Salt - a pinch
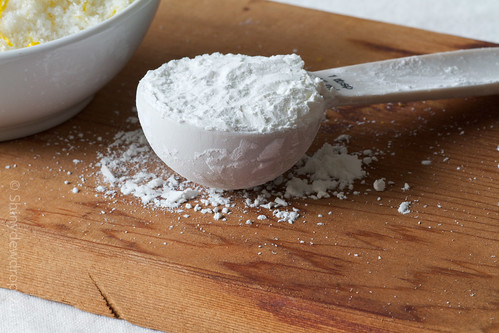
Cornstarch - 2 tbsps

Directions:
  1. Wash the blueberries, if using fresh, and put them to boil in a saucepan with a cup of water.  
  2. Bring to a boil and simmer for about 8 - 10 mins till they are cooked.
  3. Add sugar, salt and lemon juice and simmer for an additional minute while stirring the sauce to make sure that the sugar is distributed evenly.
  4. Dissolve the cornstarch in 2 tbsps of water and add to the simmering sauce.
  5. Stir continuously as it starts to thicken, and slowly bring to a boil one last time.
  6. Remove from heat and let stand covered. 
  7. You can store this in the fridge for up to 3 days.
Recipe for the Mascarpone Topping
You will need:
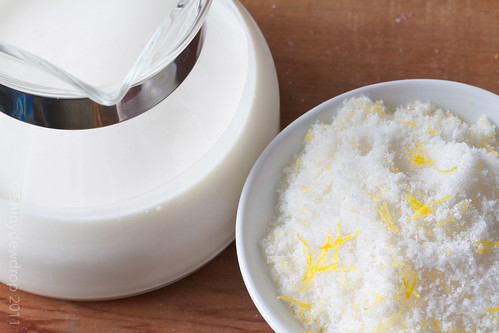
Mascarpone cheese - 225 gms
Heavy cream - 3/4 cup
Sugar - 1/4 cup
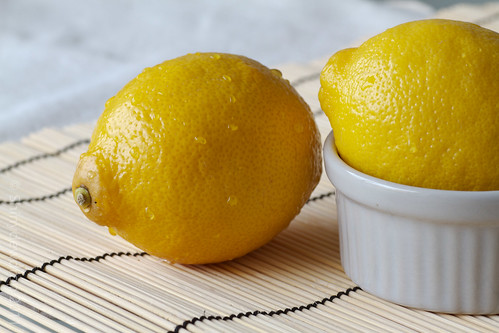
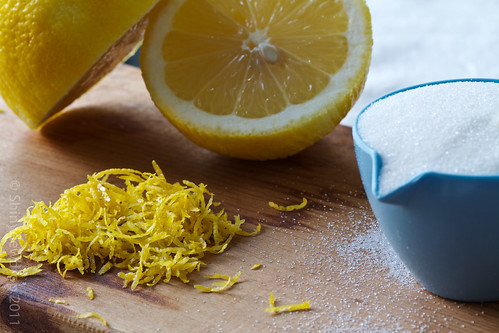
Lemon zest  from 2 medium lemons
Lemon essence - 4 - 5 drops
Piping bag with tip (optional)

Directions:
  1. In a small bowl, combine the sugar and the lemon zest.  Use your fingertips to really mix these ingredients well.
  2. In a medium bowl, add the mascarpone, cream, sugar and lemon zest mixture and lemon essence.  Beat with an electric beater until the mixture is light and fluffy and it forms moderately firm peaks. 
  3. Spoon into a piping bag with tip attached (if using), or set aside.

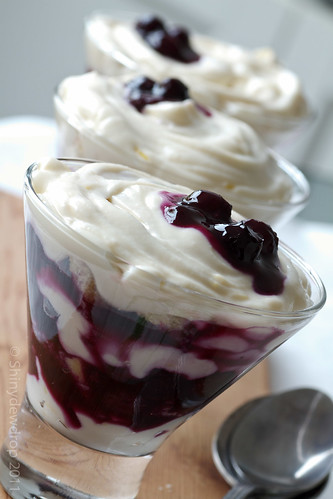
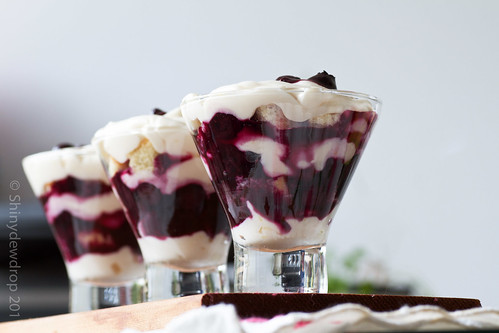
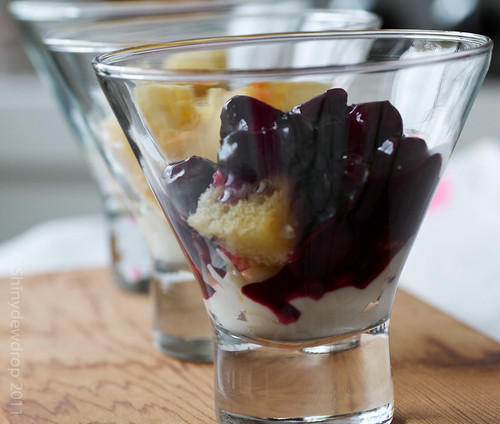
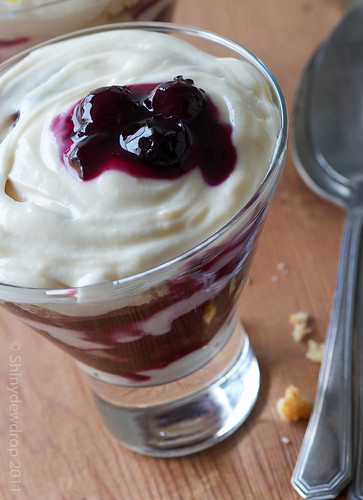
Assembling The Trifle
What you will need:
Pound cake - 4 thick slices, cubed
Blueberry sauce - 1 portion (recipe above)
Mascarpone topping - 1 portion (recipe above)
Trifle dishes/dessert cups - 4

Directions:
  1. In the cups, pipe or spoon a layer of mascarpone topping.
  2. Add a layer of cubed pound cake.
  3. Add a layer of blueberry sauce.
  4. Repeat the above steps.
  5. Finally, top off with a swirl of mascarpone, or a spoonful of blueberry sauce.

The end result is super delicious!  Check out the original recipe at My Baking Addiction - an absolutely amazing blog! The mascarpone cheese makes this really rich, so even a small serving goes a long way to throw any diet off its course!  And, watch out - this could be addictive! :)

Monday, October 10, 2011

Bell Peppers with Spicy Pork Stuffing

I had been longing to try my hand at making stuffed bell peppers, but I kept putting it off until recently (actually, not that recent, come to think of it; just didn't get the time to post this sooner).  Bell peppers were on sale (thanks to the bountiful Summer), and I thought that it would be just the right time to have a go at this. 

Sweet bell pepper stuffed with a spicy pork filling 
Anyone that knows me, knows I'm a big fan of spicy food, and fortunately for me, my son is too!  Therefore, I knew what my stuffing would be - a spicy meat filling.  

The filling

I had originally wanted to make the filling with lamb, but since luck didn't favour me that day, I didn't find ground lamb at the supermarket.  I'm not very fond of ground beef or chicken, so my only other option was to settle for pork.

I made this recipe up as I went along, and you can pretty much use any kind of meat for the filling.  I like to use a lot of onions, ginger and garlic, but you can always adapt the measurements to your taste.


I do plan to retry this recipe with crumbled Indian cottage cheese, called paneer, and mixed veggies sometime in the future.  I will be starting to get ready for my cooking classes again, so I have a sneaking feeling it won't be anytime soon.  If you try it ahead of me, please drop me a line to let me know how that came along.

Prepping

Here's the recipe that serves four!

Bell Peppers Stuffed with Spicy Pork

Ingredients
Bell peppers - 4 large (any kind will do; I used orange and yellow)
Ground pork: 250 gms
Onion, sliced - 1 medium
Green peas (frozen or fresh) - 1 cup
Potato, cubed - 1 medium
Croutons - 1 cup
Garlic paste - 1 tsp
Ginger paste - 1 tsp
Cinnamon - 1/2 stick
Cloves - 2
Green cardamom - 2
Peppercorns - 10
Cumin powder - 1 tsp
Coriander powder - 1/2 tsp
Turmeric - 1/2 tsp
Chilli powder - to taste (remember we're adding peppercorns)
Salt - to taste
Fresh coriander, chopped - 1/2 cup
Olive oil - 3 tbsp

Method
For the stuffing:
  1. In a grinder, add cinnamon, cloves, green cardamom and peppercorns and grind to a fine powder.
  2. Heat 2 tbsp of the olive oil in a large saucepan on medium heat, and add the ginger and garlic paste.  
  3. Saute for a minute and then add the sliced onion.
  4. Add the salt, and let the onions cook until they become translucent.
  5. Make a paste of all the spice powders with a couple of tablespoons of water and add to the onions.
  6. Let the spices cook for a few minutes, till they are nice and aromatic.
  7. While the spices are cooking, microwave the small potato cubes in 2 cups of water, so they are half-cooked (oven settings vary, but about 2 minutes on high in a 1000w oven).  Drain the potatoes and set aside.
  8. Once the spices look nicely cooked and you see the oil starting to leave the onion, add the ground pork. Cook well, breaking up any lumps with a spatula.
  9. Add the potatoes at this stage, cover the saucepan and let cook for about 10 mins, stirring frequently.
  10. When the potatoes are almost cooked, add the green peas, and cook covered for an additional 5 mins. 
  11. Add the croutons and fresh coriander, and mix them in well.
  12. The filling needs to be really dry, so if you see any moisture, cook uncovered for a few more minutes until completely dry. 
For the bell peppers:
  1. Wash the bell peppers very thoroughly under warm running water and pat dry with a paper towel.
  2. Slice off the tops of the peppers and retain.
  3. Pass a knife very carefully around the insides of the peppers to remove the seeds and the white pith. Be careful not to puncture the flesh on the sides or the bottom.
  4. Wipe down the insides of the peppers with a paper towel, making sure it's completely dry. 
  5. Take a few drops of the remaining oil on your fingertips and rub the insides and outsides of the peppers.  
  6. Stuff the peppers generously with the pork filling, and put the tops back on.
  7. Preheat oven to 350 deg.
  8. Line a baking sheet/tray with foil sprayed or rubbed with oil.
  9. Place the peppers on the tray and bake for about 45 mins to an hour (time could vary with different ovens). Make sure that the peppers are cooked, but not completely mushy.  They won't hold their shape, otherwise.
  10. Take the peppers out and gently brush them down with a little more oil.
  11. Put the oven to the highest temperature setting, and put the peppers back in for another 5- 7 minutes, till the skin starts to char a little. 
  12. Remove from the oven and let stand for 5 minutes, as they will be too hot to handle. 
  13. Carefully remove the peppers to a serving plate, and serve immediately.  Remember that the peppers will be a little soft and will need really careful handling to ensure they retain their shape.

Enjoy!  My son loved it, as you can tell from his plate! :)

Friday, October 7, 2011

B& W Project 52 - Week 9

B&W Project 52 - Week 9

B& W Project 52 - Week 8

Been under the weather lately, so everything is happening with a delay.  Well, as the saying goes - it's better late than never.  Therefore, I will have to post shots for two weeks together.

B&W Project 52 - Week 8